Create an AI assistant retrieval agent
If you have a single data source that you want to connect to your agent as its context, and you need the agent to retrieve information from that source, this is the ideal agent type for you. This AI Assistant Retrieval agent is designed to work quickly and efficiently.
Using the UI
To create an AI Assistant Retrieval agent, you will need to provide:
- A model: Relevant LLM model settings that will be used as the primary model.
- Prompt - Configure a prompt (optional) and an optional prompt to guide the model to perform the specific required task. Customizing the initial prompt enables the assistant to perform better by providing context and setting the direction of the conversation. You can read more about prompt engineering guidelines here
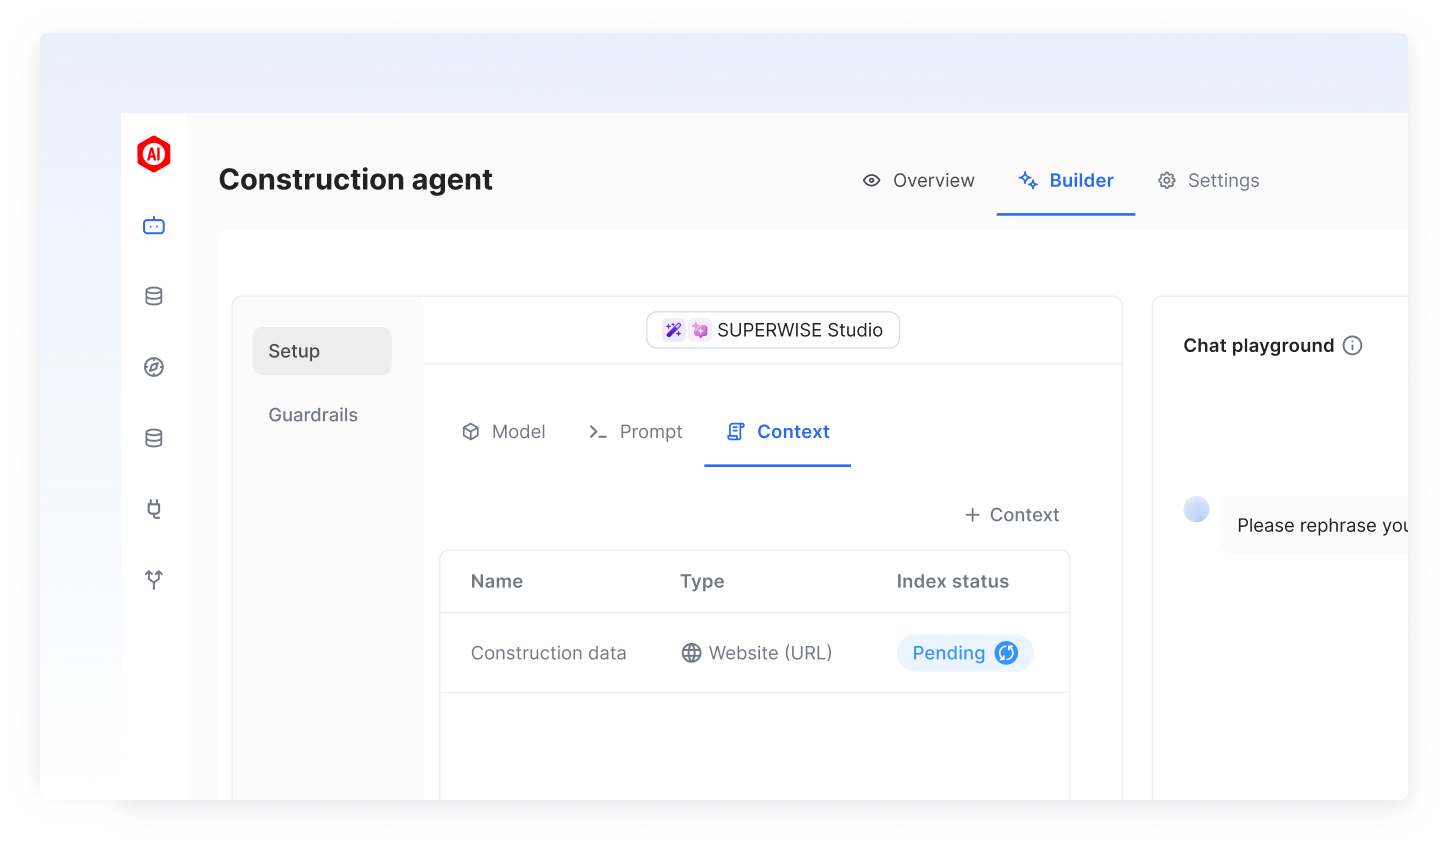
- Context: The relevant context that should be orchestrated to the primary configured model. Please note that this type of agent can only have one context added. If your agent needs to operate with multiple extensions, please use the “Advanced agent” type and add them as tools. Available context types are:
- SQL DB Context: Connect your agent to a standard DB to allow querying in natural language.
- VectorDB Context: Connect your agent to your own vector database embeddings to use existing embedded knowledge in your organization.
- Knowledge Context: Connect your agent to existing preconfigured knowledge items in the platform. To learn more about the types of knowledge items available and how to create them, please visit this guide.\
Good to knowUtilize the playground section to immediately test the chat agent based on your current builder configuration. Playground interactions are neither persisted nor recorded.
Using the SDK
PrerequisitesTo install and properly configure the SUPERWISE® SDK, please visit the SDK guide.
Create agent configuration:
from superwise_api.models.agent.agent import AIAssistantConfig

agent_config = AIAssistantConfig(llm_model=model, context=context, prompt=prompt)
Context
The following section will guide you on the specific types of context you can add to your agent.
SQL DB context
By using the SQL DB context option, you can connect your database and provide the model with valuable context, improving the quality of interactions.
Here’s how you can do it:
Database support and configuration
Supported DB'sEnsure that your database is one of the following supported types:
- PostgreSQL (dialect:
postgresql)- MySQL and MariaDB (dialect:
mysql)- Oracle (dialect:
oracle)- Microsoft SQL Server (dialect:
mssql)- BigQuery
Password limitationsPlease note that passwords should not contain the characters
@and:. If your password includes these characters, you will need to modify them in your connection string as follows:
- Replace
@with%40. For example:dialect://admin:My%[email protected]/dbtest- Replace
:with%3A. For example:dialect://admin:My%[email protected]/dbtest
Database Query Limit NoticeTo maintain optimal performance, each query is currently capped at a limit of 100 entries.
Postgres table schemaPlease ensure that all column names are in lowercase with no capital letters.
Using the UI
Step 1: Add the Context
Click on the "+ Tool" button, and then SQL DB tool" start setting up the database connection.
Step 2: Configure the Context
- Assign a meaningful name to the tool.
- Database Selection and Connection: Identify and connect to your chosen database by providing the requisite details:
- For BigQuery:
- Specify your
BigQuery project. - Input the
BigQuery datasetyou intend to query. - Input your
GCP service accountinformation for credential validation (in a JSON format).
- Specify your
- For Other Database Types:
- Construct your Database URL in the format:
dialect://username:password@host:port/database. Ensure you replace the placeholders with actual values specific to your database credentials and connection information.
- Construct your Database URL in the format:
- For BigQuery:
- Select specific tables for your Context: To enhance agent performance and control access to specific tables in your database, you can configure your agent to access only selected tables. You have the flexibility to choose which tables your tool can access, grant access to all tables if needed, and enable automatic inclusion of any new tables added to the database.
Using the SDK
You can find the complete creation flow of the "AI Assistant Retrieval" agent here. This SDK code snippet pertains to the creation of the SQL DB context within this flow.
from superwise_api.models.tool.tool import ToolConfigSQLDatabasePostgres
from superwise_api.models.context.context import ContextDef

db_context = ContextDef(name="My DB", config=ToolConfigSQLDatabasePostgres(connection_string="POSTGRESS DB CONNECTION STRING"))
Vector DB context
VectorDB enables you to generate embeddings for your content, such as websites or extended texts, and store them in your dedicated VectorDB. Once stored, SUPERWISE® facilitates the retrieval of data from these embeddings, allowing your agent's model to utilize it for additional context. Currently, SUPERWISE® offers support for pgvector (PostgreSQL) and Pinecone.
Pay attentionPlease note that to achieve this successfully, you must use the same embedding model in SUPERWISE® that you used to store the data.
PostgreSQL limitations
- Password limitations: Please note that passwords should not contain the characters
@and:. If your password includes these characters, you will need to modify them in your connection string as follows:
- Replace
@with%40. For example:dialect://admin:My%[email protected]/dbtest- Replace
:with%3A. For example:dialect://admin:My%[email protected]/dbtest- Table schema limitation: Please ensure that all column names are in lowercase with no capital letters.
PGvector Prerequisite: Setting up vectorDB for SUPERWISE® integration
Before you begin, ensure your database meets the following requirements:
When connecting Postgres vectorDB to the SUPERWISE® agent, the following tables are required in the database:
langchain_pg_collection
This table is used to save all the collections of documents (referred to as a "table" in the SUPERWISE® platform).
DDL:
CREATE TABLE public.langchain_pg_collection (
    name varchar NULL,
    cmetadata json NULL,
    uuid uuid NOT NULL,
    CONSTRAINT langchain_pg_collection_pkey PRIMARY KEY (uuid)
);
Columns explanation:
- name: The name of the collection (this is the table_name when creating the tool).
- cmetadata: Metadata for the collection.
- uuid: The ID of the collection.
langchain_pg_embedding
This table is connected to the langchain_pg_collection table and stores documents along with their embeddings.
DDL:
CREATE TABLE public.langchain_pg_embedding (
    collection_id uuid NULL,
    embedding public.vector NULL,
    document varchar NULL,
    cmetadata json NULL,
    custom_id varchar NULL,
    uuid uuid NOT NULL,
    CONSTRAINT langchain_pg_embedding_pkey PRIMARY KEY (uuid)
);

ALTER TABLE public.langchain_pg_embedding
ADD CONSTRAINT langchain_pg_embedding_collection_id_fkey
FOREIGN KEY (collection_id)
REFERENCES public.langchain_pg_collection(uuid)
ON DELETE CASCADE;
Columns explanation:
- collection_id: The ID of the collection the document is connected to.
- document: The text document.
- embedding: Embedding of the document.
- cmetadata: Metadata for the embedding (to enable cite sources, it should contain the source information like this: {"source": "https://js.langchain.com/docs/modules/memory").
- custom_id: User-defined custom ID.
- uuid: The ID of the document embedding.
Using the UI
This guide will walk you through creating a VectorDB context using the user interface client. VectorDB context help connect your system to a database containing vector embeddings, which can be used to enrich prompts and improve model understanding.
- Add a New Context:
- Click the "+ context" button. This opens a menu where you can choose the type of context you want to add.
- Select "VectorDB" to begin setting up the connection.
- Name Your context: Assign a descriptive name to your context.
- Choose the VectorDB Type: This refers to the specific type of database technology used for your VectorDB. If you're unsure, consult your system administrator.
- Connect to Your Database: Enter the necessary connection details to connect to your VectorDB instance. The required details vary depending on the specific VectorDB you are using:
- Pgvector:
- Provide the connection string in the following format:
postgresql://username:password@host:port/database - Enter schema name (Optional)
- Enter the table name
- Provide the connection string in the following format:
- Pinecone:
- Enter your Pinecone API key
- Provide the Index name
- Pgvector:
- Link your embedding model : Provide information about the specific model here. Please pay attention that to achieve this successfully, you must use the same embedding model in SUPERWISE® that you used to store the data.
Using the SDK
You can find the complete creation flow of the "AI Assistant Retrieval" agent here. This SDK code snippet pertains to the creation of the VectorDB context within this flow.
PGVector VectorDB
from superwise_api.models.tool.tool import OpenAIEmbeddingModel, OpenAIEmbeddingModelVersion, ToolConfigPGVector
from superwise_api.models.context.context import ContextDef

vector_context = ContextDef(name="Context name", config=ToolConfigPGVector(
    connection_string="Connection string",
    table_name="Table name",
    db_schema="Schema",
    embedding_model=OpenAIEmbeddingModel(version=OpenAIEmbeddingModelVersion.TEXT_EMBEDDING_ADA_002, api_key="API KEY")
)
)
Pinecone VectorDB
from superwise_api.models.tool.tool import OpenAIEmbeddingModel, OpenAIEmbeddingModelVersion, ToolConfigPineconeVectorDB
from superwise_api.models.context.context import ContextDef

vector_context =ContextDef(name="", config=ToolConfigPineconeVectorDB(
                api_key="pinecone api key",
                index_name="test",
                embedding_model=OpenAIEmbeddingModel(version=OpenAIEmbeddingModelVersion.TEXT_EMBEDDING_ADA_002, api_key="Open AI Key")
            )
)
Knowledge context
SUPERWISE® now enables you to boost your agent by creating a connect your pre-created knowledge base within SUPERWISE® agent. For setup and indexing guidance, refer to pre-created Knowledge. This integration enhances your agent's responsiveness and enriches user experience
Using the UI
Step 1: Add the Knowledge Context
Click on the "+ Context" button, and then SW Knowledge"
Step 2: Configure the Context
- Assign a meaningful name to the context.
- Select your pre created knowledge
Using the SDK
You can find the complete creation flow of the "AI Assistant Retrieval" agent here. This SDK code snippet pertains to the creation of the Knowledge context within this flow.
from superwise_api.models.tool.tool import ToolConfigKnowledge, OpenAIEmbeddingModel, OpenAIEmbeddingModelVersion, UrlKnowledgeMetadata
from superwise_api.models.context.context import ContextDef

knowledge_context = ContextDef(
    name='Context name',
    config=ToolConfigKnowledge(
        knowledge_id='Knowledge ID',
        knowledge_metadata=UrlKnowledgeMetadata(url='URL', max_depth='MAX_DEPTH'),
        embedding_model=OpenAIEmbeddingModel(version=OpenAIEmbeddingModelVersion.TEXT_EMBEDDING_ADA_002, api_key="Open AI key")
    )
)
Updated 9 months ago